Showing posts with label Chevron. Show all posts

A little Surprise from the Vault


Hi everyone! Recently I reorganized all my old nail pictures and I came across a bunch of never posted manis, including this lovely tape mani from literally years ago. Brown has never been my favorite color when it comes to nail polish, but I actually think it works well with the colors I used here. The gorgeous matt taupe is OPI You Don't Know Jacques Suede and I believe I used China Glaze 2030 and Orly Sapphire Silk for the unusual chevrons. No topcoat, because that would ruin the different finishes in all the layers. ;) Thanks for reading!

Chevrons with a Hint of Shimmer


Hi everyone! This post I have chevrons to show you. Chevrons on nails is something I never seem to get tired of, even after all this time. They can be so subtle and yet give your nails something edgy at the same time. I just love it!

For this mani I combined a murky purple-grey color with a nice shimmer to add a bit of elegance. The green-blue shimmer polish is H&M's Lady Luck. I applied one sheer coat of it, which dried quickly so after a couple of minutes I was able to make the chevron shapes, using trusty tape strips and a layer of Bleu Asphalte from Bourjois.

I hope you like it, and if you would like to see more of the chevron manis I've done, just head over here. Thanks for reading and see you soon!

Art Deco Sunburst


Closing this year with a big bang, on the nails. :-) Like my last post this mani features elements from Art Deco, a style introduced to me by my father. It took me a while to like it, as I was so in love with and used to the curvy and organic lines of its predecessor Art Nouveau, but now I can't get enough of both. ♥ Deco has these slick and stylized shapes, making it look so grand! It just keeps wowing me everytime.

For the nail art I used the explosion design and a gold striper to freehand the little chevrons. All this on top of two coats of the blue Never On Sunday from Only You (house brand of Ici Paris XL).

Heading off to family to celebrate New Year's Eve now. I wish you all a happy and healthy new year!

South Africa?


Hello everyone! I'm interrupting the 31 Day Challenge for this colorful tape mani. The reaction that I heard most about this mani is how it looks like the South African flag. While it wasn't intended, I agree it kind of does. Not just the design, but even the colors are a bit similar. However, this mani was actually a result from adjusting and experimenting with an earlier design; the fifty-fifty mani. I had worn the corally pink color (H&M Wildflower) for a day and added the muted teal the next morning. And though I already liked how that looked, I had to do something that would cover up my slight tipwear, hence the purple chevrons which you see in the last picture. That was cute too but it wasn't quite finished until I added the little black chevrons. Amazing how much of a difference a bit of black can make. ^^

This mani was also a great oppurtunity to try out two new polishes from Etos (Dutch drugstore), #122 (teal) and #118 (purple). Etos recently released a whole bunch of new exciting colors and I'm thrilled about it, because both their quality and price are quite reasonable (€2.50 for 5ml/0.5 fl.oz). Thanks for reading!

Big thank you to my little brother for taking this picture for me. ^^

Chic Chevrons


Hi everyone! For this post I have chic chevrons to show you, in a quite unusual color. I'm talking about my basecolor which is Heavenly from the Dutch brand Koh. Heavenly is a dusty pinktoned beige creme. It's one of the few nude colors I've ever worn. I know nudes are very popular these days, but I never really payed attention to them before since I like bright colors on my nails so much. Then Koh kindly sent me Heavenly (among other polishes) for review and I'm glad they did! I never thought I could like nudes a lot but I actually loved Heavenly, and wore it for several days which is quite long for me. Also the formula and application were really nice. Because of the light color I expected it to be chalky, but it applied like butter and covered in two coats.

After two days I decided to add nail art to my calm mani. I always think dusty pinks look really chic with a hint of black or gold, so I used both of them in these chevrons which I made with tape. First I made the outer black chevron, later I added the smaller gold one and then another smaller black one. The polishes I used for the job were Color Club Where's The Soiree? and China Glaze 2030, both dry extremely quickly which saves a lot of time when you're doing a tape mani. :) Thank you for reading!

Koh Heavenly was sent to me for review. This does not influence my opinion on the reviewed product.

Blog birthday!

(That's Kleancolor Blind Date in the background. ^^)

Hi guys! Today my blog is exactly one year old! I can't believe how fast everything went, time sure flies when you're having fun. ^^ Thank you all so much for visiting and sharing your comments, I hope I can do this for a long time. :-)

For this special post I made a blue and gold tape mani. I did have to file down all my nails because I had a deep tear in one nail. And though I don't like my nails this short, I decided to embrace my little nubbins anyway because how can I not share the nail art I made with you! ;-)
The lightblue with shimmer is called Top Of Emotion from a new brand called Anny. I'll have to make an individual post for Top Of Emotion some time, because it's so pretty! I was already wearing it for a day, so I could immediately start placing the tape strips for the zigzag pattern I was initially going for. I already liked the result after one zigzag with Essence Into The Dark, so I included a picture of that as well. :)


But I couldn't stop there haha, so finally I added a hint of gold with H&M Golden Treasure. As you can see, the end result is a bit different than my usual zigzag manis, instead of repeating the zigzag shape with the third polish, I just did a chevron so lots of the darker blue stays visible. :-) I hope you guys like it! And thanks for reading. ^^

Art Deco chevrons


Hello guys! First of all, I'd like to thank everyone who wished me a happy birthday in my 
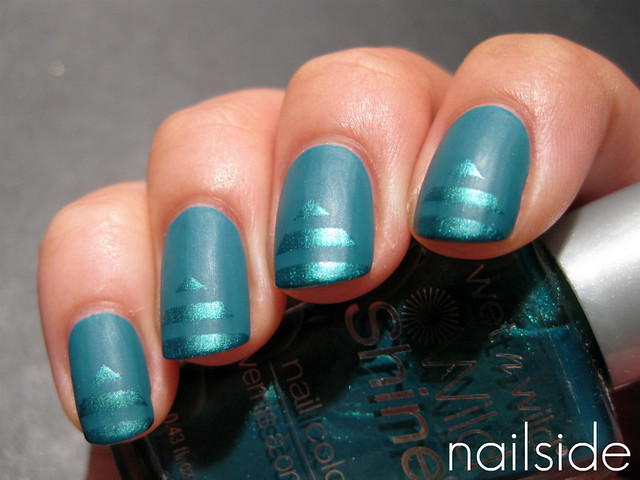
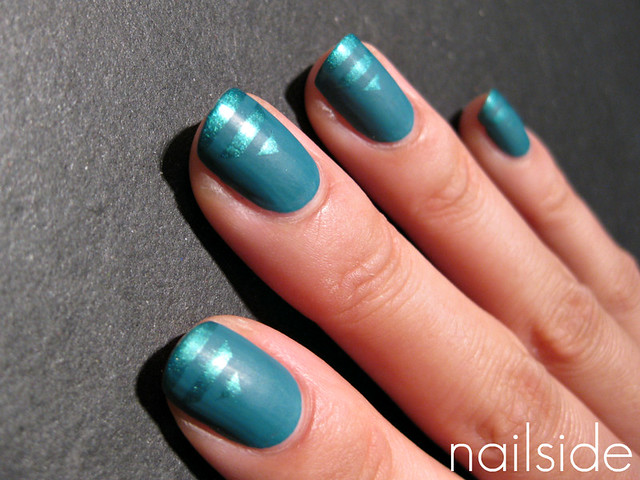
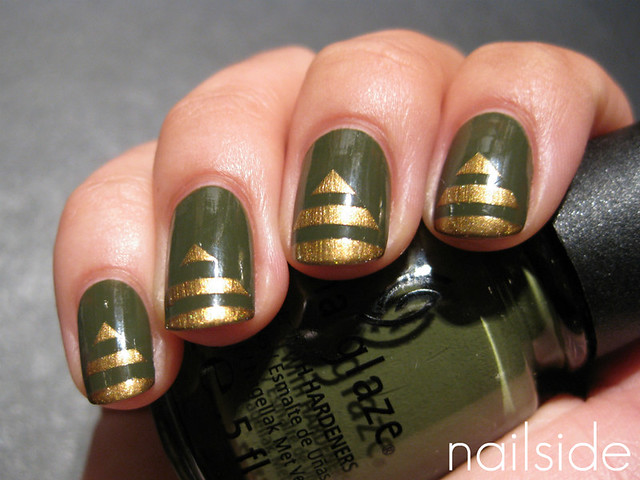
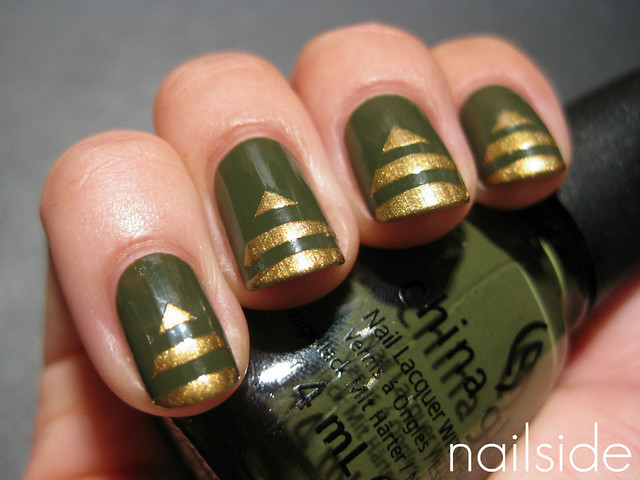
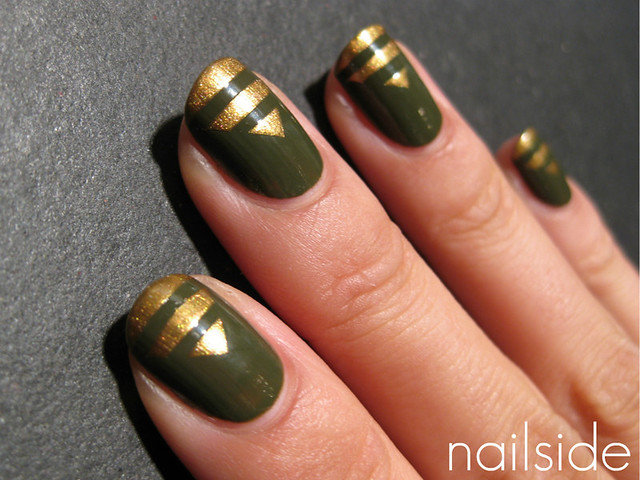
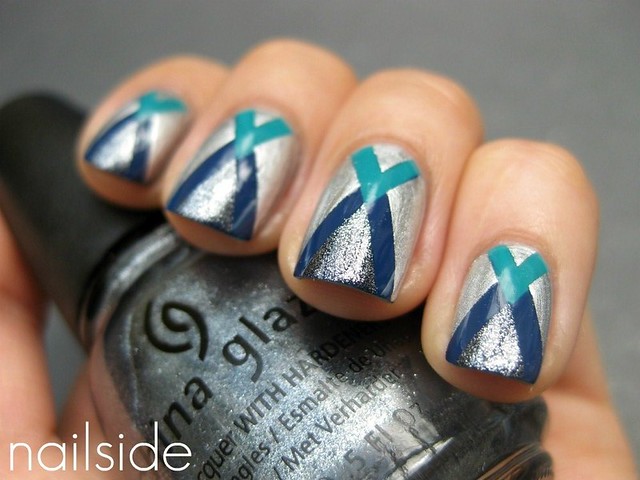
last post, it was very nice to hear, but I just celebrated my birthday last month, haha. The birthday nails were specially made for a reader who requested a birthday mani for her own special day ;-) So no birthday presents to share with you, but I do have these elegant chevrons in Art Deco style. The pictured bottle of polish, which I used as my base color, is M91 from a new cosmetics brand called Make-Up Studio. They carry a huge, colorful collection of eye-shadows, lipsticks, blushes, brushes, fake lashes etc. and... nail polish :) They just opened a brand new store in our local shopping mall, so last week I went for a look and M91 was one of the products I came home with. It's a dusty green creme which is close to Mint in Wikipedia's List Of Colors. The formula was pretty nice but the best thing is it covers in one coat ^^ I own quite a few dusty, grey-ish greens/mints, but none of those is similar to M91. So I'm happy to have yet another one in my stash! It's a shame though, that Make-Up Studio didn't give their polishes a real name, instead of just a number. They've got quite a few unique babies in their collection that truly deserve more identity. I admit they do cost a lot (12.90 for 12ml/0.41fl.oz.) but as I said, some are really unique and worth the money, if you want to spoil yourself :) Anyhow, the day after I added the first chevrons with tape, using China Glaze's Jitterbug. The little chevrons at the tips were made with China Glaze Ink. It's a striper polish with a perfect covering formula, the thin brush is perfect for making stripes but also for freehanding, like I did here. It came in really handy, because I felt way too lazy to wait for another coat of polish to dry, like I would've if I used tape again. Finally a layer of Essence Matt top coat and tada! Thanks for reading :)

Pyramid tips with Essie Fair Game


Hi everyone! These pyramid chevron tips were made with Catrice Raspberry Fields Forever and Essie Fair Game. Both polishes are amazing to work with. Raspberry Fields Forever is a bright folly red, which has a pink hue that's much better visible in real life. It has the great formula and easy application that I'm used to from most of Catrice's creme polishes, I only used two coats and a layer of Seche Vite, shiny! Because Fair Game has that hint of blue that makes the polish so special, I thought it would look nice next to the pinkish Catrice. I just love the combination of pinks and blues, no matter how subtle ;-) I've never worn Fair Game as a full mani and question if I ever will, because as much as I like it, I just think it works better as an accent next to other colors. At least, on my skintone that is, I bet it would look gorgeous on people with a nice tan!

Leopard chevrons


Wow! This look so isn't me, hahah. But once I had the idea I just had to make it reality. I used tape to make the chevrons, then I added H&M Golden Treasure for my gold background and finally I used konad plate M57 for the leopard print. Normally I suggest people to remove the tape right after applying the polish, to prevent the polish from sticking to the tape, but this time I ignored my own advise. But it turned out alright, as you can see :D I applied very thin coats and then after I stamped, carefully removed the tape strips, one by one. The pretty blue metallic/shimmer is Sephora's Summer In Bangkok, my favorite Sephora polish after It's Time To Rock. It's actually more turquoise in real life, very pigmented and unfortunately also stains so bad! That's why I'm wearing two layers of base coat underneath... Anyway, would you wear this wild design? Or does it scare ya? ;)

Turquoise pyramids


Hello everyone! How are you? I hope fine :) I'm alright, but something terrible did happen today! Somehow one nail of my left hand got teared a bit this week. I've been really good and didn't touch it for days but I guess the stress had taken over today, because I kept picking on it and now I've got a little nub there. Boohoo! So I made the rest of my nails shorter too to make it less noticeable. And so I won't be taken any pictures for a little while, because I don't like my nails this short :( But lucklily I still have a few manis from the vault for you. And today's post is one of them.

My basecolor is P2's Groovy. What a wonderful polish! I don't own many P2 polishes but my mom bought me some bottles a few weeks ago. I really loved the elegant shape of the bottles and I love them even more now when I found out how perfect Groovy was. It's a muted shade of teal, with a perfect creme formula and you can get away with one coat of it. Lovely! The next day I decided to add the 'pyramid' design, like I used in the 'military chic' mani. I used Wet 'n Wild Carribean Frost for it, which gave a subtle ton-sure-ton effect, I really like that shimmery teal polish :) And as my finishing touch I mattified the look with the sadly discontinued Essence Matt topcoat. Maybe I'll give China Glaze's Matte Magic a try when I'm through my back-ups. Anyway, enough rambling for today! ;) Have a great night!

Military chic


Hello guys! I hope you all had a great weekend. This look was made a couple of days ago. I was wearing China Glaze Westside Warrior from the Metro collection. What a beautiful shade of green! The application was wonderful too. I loved it and couldn't stop looking at my nails, it's unlike any other green I own. But a few days later I got tipwear on several fingers, I was bummed because I didn't want to take Westside Warrior off... So what do you do when you want to keep a polish on your nails, but it's suffering from tipwear; you go for a funky French ;) I was just playing around with my tape strips when I finally got to this design, and I must say I like it a lot! Though the whole look has a military feel, the tips reminded me of pyramids. Pyramid tips ^^ The gold shimmer I used for them was H&M Golden Treasure. It's an antique shade of gold, very pretty and very nice for tape manis. The formula is smooth and it doesn't dry too quick :) And a little by the way, these pictures were made under my boyfriend's granny's lamp, which belongs to our appartment now. Apparently it's great in mimicing sunlight! And that's awesome, because it means I can keep taking my pictures, even in the winter! Regardless of the weather and whenever I have time to, hooray! Have a great night everyone and I'll see you soon :)

V-gap experiment, part 2

Hi guys :) Good morning. Today I'm going to show you part 2 of my previous V-gap experiment. I added a lot of silver (China Glaze Millenium) to the design, but that just didn't work, haha. So I added a tiny bit of red to make it better. I used a jelly for it, that's why you can still see the silver V-moon underneath. Finally a layer of matt topcoat et voilà... Thanks for watching!

Before

V-gap experiment, part 1

Hi everyone! I hope you are all doing fine. As you may have noticed, I haven't been posting daily anymore. It's because I've just started with my bachelor Communication and Multimedia Design, which will be my main priority from now on, so I won't be able to spend a lot of time on nails or post as much as I used to. I'm sure going to miss working on this little blog but I will keep posting, just not as often as I'd like to. So that was my little announcement. Now let's show some nails :)


This is a mani from the vault. I was experimenting a bit, trying to find a new design, with the V-gap as my starting point. I used China Glaze First Mate as the base color and the turquoise is Essence Bella. The finished V-gap could use some shimmer so I added China Glaze Jitterbug to the tips, which made it look more spectacular :) After this I updated my nails again, hence 'part 1' in the title, how part 2 became will be shown tomorrow... ;) Going to bed now, have a great night!