
Showing posts with label Layering. Show all posts
Tutorial: Abstract '80s
 32 comments


A Broken Heart


Hi everybody! For this post I have a broken heart for you. Nothing to worry about though, I just thought it would be a cool design as I'm still experimenting with sheer polishes. :) I used my vertical lightning bolt design, then I painted the heart on top with a stencil I made from tape (like I used in this mani). I'm not sure if I like the colors I used, but I'm glad the idea I had in mind came out pretty much the way I wanted, yay! Thanks for reading! :)
H&M - Bella's Choice
Essence - Stamp Me! White
Color Club - Warhol
A Fresh Version


Hi everybody! First of all: thank you so much for all the amazing comments you guys left on my last post, my abstract '80s mani. I seriously didn't expect so much feedback, thank you! Also I received many requests for a tutorial and I wanted to let you know I'll happily work on it soon. :-)
I liked the '80s mani myself a lot too, plus it's fun to do, so I made another version. Same idea but in fresher colors. :-) The basecolor is the classic China Glaze For Audrey, I love this polish! (It combines so well with different colors.) I used Color Club Almost Famous for the yellow and the sheer blue is Color Club Chelsea Girl. I really like the bright color of Chelsea Girl, but was so disappointed when I found out how sheer it was (4-5 coats for opacity, if you don't use a white base). However, that sheerness has a purpose from now on. :D What do you think of this blue and yellow mani?
Abstract '80s


Hi guys, another tape mani for you today! Oh, how I love stationery tape. It's so perfect for making geometric shapes, which I happen to love too. ;-)
After (re)discovering the layering possibilities of sheer polishes with my recent springy stripes, I used the same technique in this mani. My base color (H&M Polish Me Happy) was applied the day before, so I could immediately place tape strips on top to form the mint green shapes with Orly Ancient Jade. When that had dried I once again used tape to make the pink triangles with Color Club Warhol and I just love how new shapes are formed where Ancient Jade and Warhol overlap. Speaking of Warhol, it's such a great polish for this layering technique. It's sheer, but covers very evenly and the color is so unbelievably bold! (Also take a look at layered Warhol together with its neon friends in this crackle mani.) And that's it for this post, I hope you enjoyed it. :-)
Springy stripes


Now that spring is slowly starting to appear, I've noticed I like to wear pastels more often now. This week I'd been wearing China Glaze Lemon Fizz for a few days and when I got tired of it I spiced it up with a colorful tape mani. It wasn't my intention to make stripes though, after I did blue tips with China Glaze For Audrey I wanted to add geometric patterns in coral with Essence Think Pink. However, Think Pink was a lot sheerer than I thought, creating different tones of coral with the polish underneath. (The middle two colors are For Audrey and Lemon Fizz underneath Think Pink.) I was so pleasently surprised by this that I continued playing with this layering effect and ended up with these cheerful stripes. :-) Thanks for reading!
W.I.C. Frederiksberg & Aspen
Hi guys! Yesterday I showed you two of the four polishes Herôme sent me for review: Roskilde and Hollywood. Today it's time to show the second two, which are my favorites of the bunch!


Meet Frederiksberg from the Denmark collection, a gorgeous smokey purple creme. I'm so in love with the color, but what makes it even more special is the subtle pink shimmer. It was hard to capture the shimmer in the pictures, but if you look at the first one you can see a bit of it at the bottom. On the nails the pink isn't so obvious, but that's fine with me, because this polish already stole my heart with the trendy color. In addition to that, the formula was again just perfect, like it was with Roskilde. Two thin coats were all I needed to get everything opaque and even.
The second glitter I received is Aspen, which is part of the Wickedly Glamorous collection like Hollywood. Aspen is a glitter polish with tiny silver glitters in a clear base. At first it seemed like a 'regular' silver glitter with small round or hexagonal glitters, but when I looked up close I could see they're actually elongated, which creates a slightly different finish. I like it! In the picture below I applied one coat over Frederiksberg. The glitters are dense and spread evenly, though without hiding the beautiful base color underneath. Because of this and the fact it goes with so many colors in my opinion, I can see myself wearing Aspen a lot. For holidays of course, or just to add a tad of glamour during the rest of the year. It would make a great combination with other (smokey) cremes too.

I think it's clear I'm in love with both haha, what do you think of them?
W.I.C. nail polishes are available in the Herôme online shop for €7.50 per bottle of 0.7ml/0.2 fl.oz., or €12.50 for two. Shipping is worldwide. The products in this post were sent to me for review. This does not influence my opinion on the reviewed product.
W.I.C. - Roskilde & Hollywood
Hi everyone! For this post I have some polishes from W.I.C. by Herôme to share with you. Herôme is a Dutch nail and hand care brand, they first started selling mainly treatment products but now also have a big, colorful nail polish collection named W.I.C. (World Inspired Colours). Each polish is inspired by and named after a big city. I'm a very, VERY lucky girl for having the entire W.I.C. core collection that I won in a nail art contest, but in addition to that Herôme has kindly sent me four new polishes from their latest limited collections from which I'm going to show you the first two today.
 |
| From left to right: Aspen, Hollywood, Roskilde and Frederiksberg. |


This pretty from the Denmark collection is called Roskilde. Roskilde is a corally pink creme with a subtle pink shimmer. Because the pink is red-toned, it's a lovely warm color which actually suits my skintone, unlike many other soft pink shades. I know it looks pretty much just coral in the pictures, but that's because my camera just won't capture the pink tones in colors like this. The formula was excellent, like I'm used to from their other cremes, and the application was easy with the flat brush. So a great polish I'd say, although it's not unique. The first time I had Roskilde in my hands, it immediately reminded me of Essie Your Hut Or Mine which I also have. They looked so identical in the bottles that I didn't bother to compare swatches. They both have the same color and amount of the pink shimmer. And both need two coats to cover. Although I absolutely prefer Roskilde over Your Hut Or Mine appliaction-wise, since the latter tends to leave bald spots on me with the second coat.
 |
| W.I.C. Roskilde and Essie Your Hut Or Mine |
Next up is Hollywood from the Wickedly Glamorous collection. Hollywood is a blend of small iridiscent and silver glitters is a sheer pink base. The formula is smooth and the glitters spread evenly, nothing to say there. It looks amazing in the bottle with the pink base, very princessy, though the pink will not show on the nails so I applied it over Roskilde. It looks so girly! ^^

All in all I think both polishes are nice to have, Roskilde in particular, though you won't need them if you've got something similar in your stash. What's your thought on these polishes?
W.I.C. nail polishes are available in the Herôme online shop for €7.50 per bottle of 0.7ml/0.2 fl.oz., or €12.50 for two. Shipping is worldwide. The products in this post were sent to me for review. This does not influence my opinion on the reviewed product.
China Glaze Designer Satin + Essence Blair


Hello everyone and happy New Year! :-) For my first post of 2012 I have this simple layering combination of China Glaze Designer Satin and the amazing glitter Blair from Essence. Both are polishes that I can't live without. Though there may be many other pinks like Designer Satin, it has a special place in my heart because it was one of my first China Glaze polishes. The deep, berry pink color is timeless and can be both sweet and girly, and funky or edgy (I like it a lot in this mummy tape mani). Blair is part of an Essence Nail Art Twin together with Chuck. The different sized hexagons in a dark silver make it a very special polish, which can be worn over about any color, great over brights but also softer, muted shades like I did in this skittle. Of course everything had to be mattified afterwards, you know how I like matte glitters ^^ Thanks for reading!
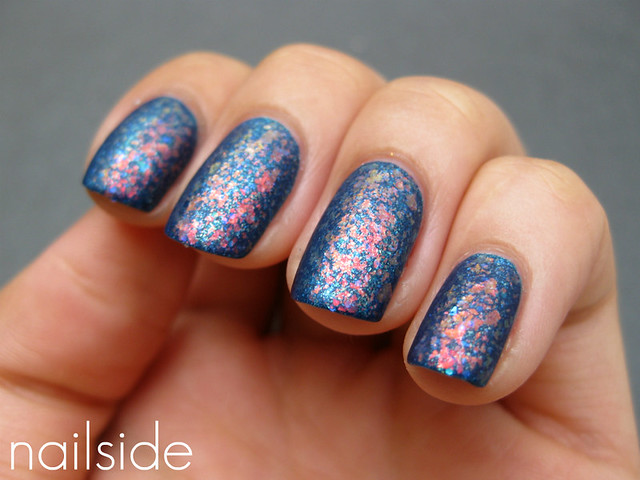
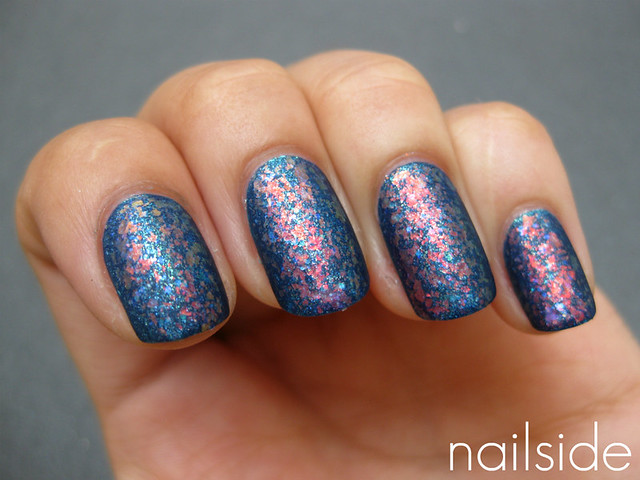
Blue and turquoise glitter cocktail


The bottom picture was taken in daylight the next day, it shows the blended effect a little better. (Excuse my tipwear :)) What do you guys think about this combination?
 |


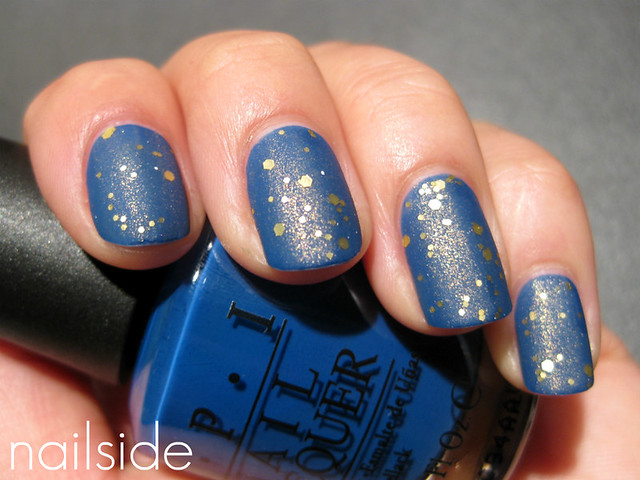
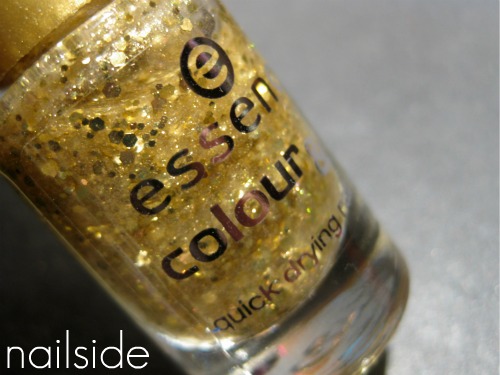
OPI Dating A Royal + Essence Make It Golden


Outer Space Marble - A layering experiment
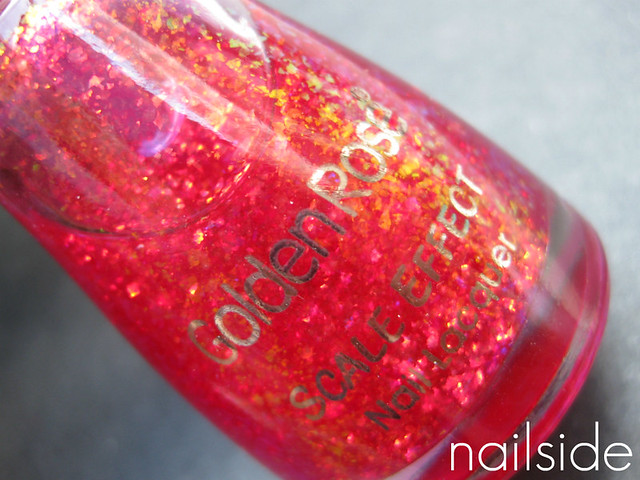
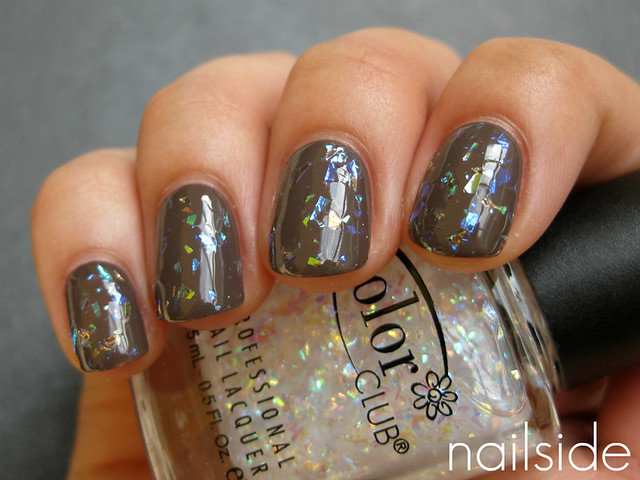
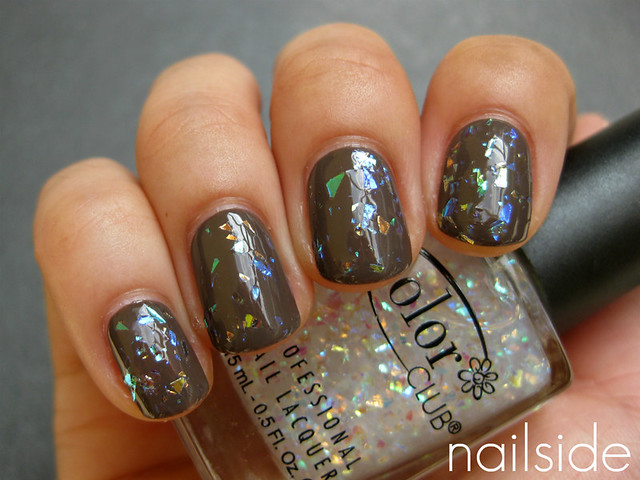
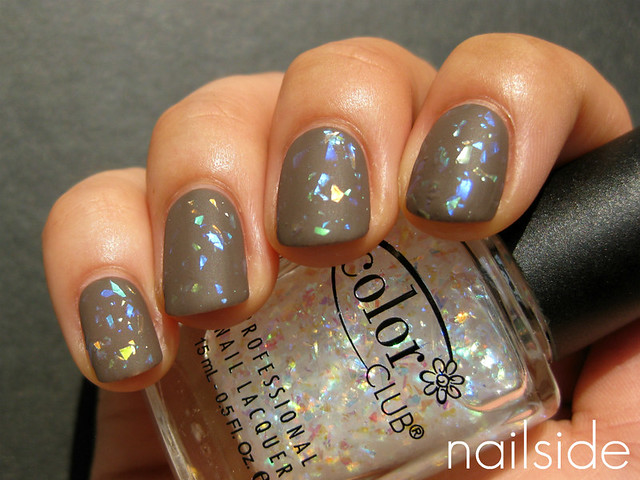
Hi guys! Today I'd like to show you a layering experiment I did a little while ago. I started with China Glaze First Mate, on top went Milani Cyberspace from the 3D Holographic collection, OPI Last Friday Night, Golden Rose #10 aaand... *gasp* ...matte topcoat. That's a mouthful. I really love the endresult, it looks like some kind of marble from outer space hahah. Quite interesting. Surprsingly Last Friday Night, which usually turns any polish into magic, was a bit unnecessary this time as it was hardly visible on top of Cyberspace. Golden Rose #10 on the other hand is just mind-blowing gorgeous! Pretty red flakies. In the bottle you can see them shifting from red to gold, to green and blue. But even after a zillion shots I wasn't able to capture the complete rainbow. A shame, because it's so pretty in real life!
I used many polishes to achieve this look, but surprisingly everything dried pretty well, because I only used one coat of each. And as I said, Last Friday Night could be left out the next time I do this. Have a great weekend everyone :)
I used many polishes to achieve this look, but surprisingly everything dried pretty well, because I only used one coat of each. And as I said, Last Friday Night could be left out the next time I do this. Have a great weekend everyone :)
Heavy layering experiment
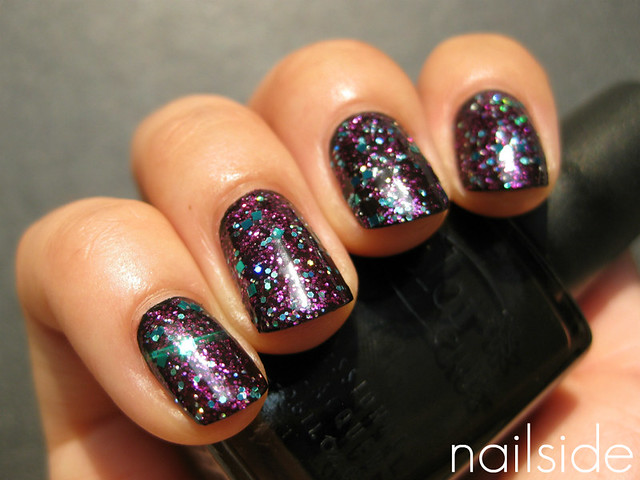
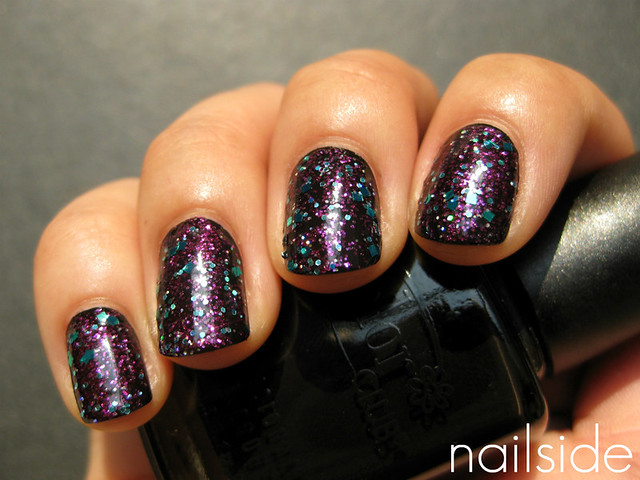
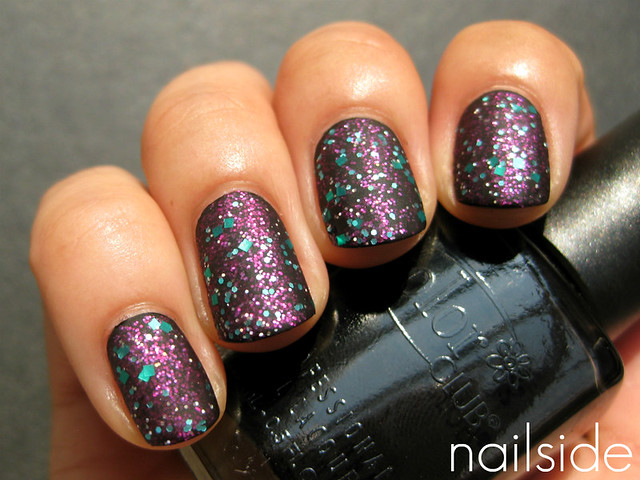
Hello guys! For this post I have a layering combination for you. I had just bought a purple/fuchsia glitter polish from Claire's and used it over one coat of black (Color Club Where's The Soiree?). The glitter applied well and evenly, I really like that, plus it was a lot denser than I expected it to be. For a bit more color and contrast I added a coat of Essence Edward, this extremely gorgeous teal glitter. After that there was a lot going on, but I'm a true glittergal, so I'm in love haha. Of course I also applied a matte topcoat to share the mattified finish with you. What are your thoughts?
OPI You Don't Know Jacques + Color Club Covered In Diamonds
Hi readers! The other day I showed you OPI You Don't Know Jacques. It's a very calm and subtle color, very beautiful, but I was curious to see it with just a little bit more sparkle. So here it is with a coat of Color Club Diamonds. I like the combination and love iridiscent glitter/flakies. They're sparkly enough to add a lot of magic to a dull mani but yet they're subtle. Sounds quite contrary, doesn't it? :P So a party for the eyes but too bad Covered In Diamonds has such a thick formula. It made my nails look thick and plumpy. And I guess another layer of matt topcoat over them won't help either, but I just had to see what it would look like mattified :) What do you think about this combo? Thanks for stopping by!
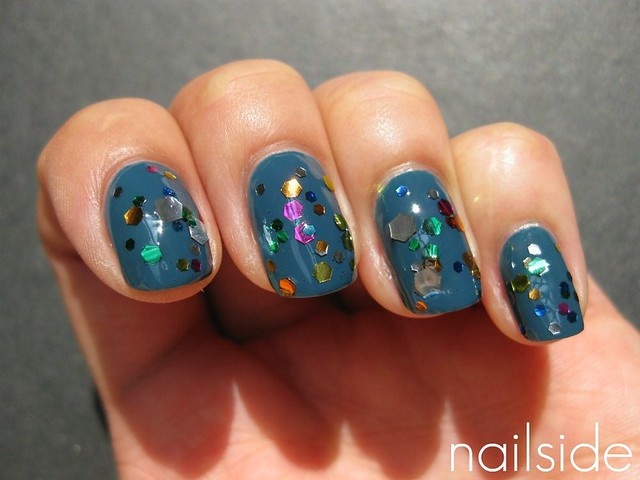
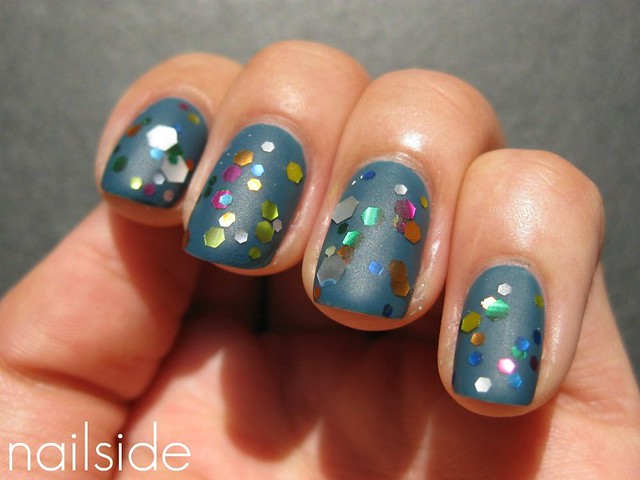
Orly Sapphire Silk + Kleancolor Afternoon Picnic
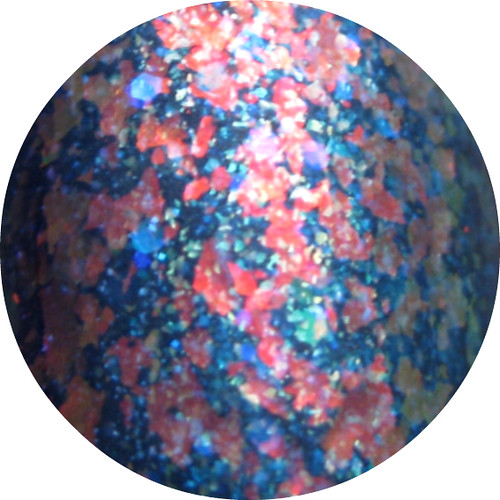
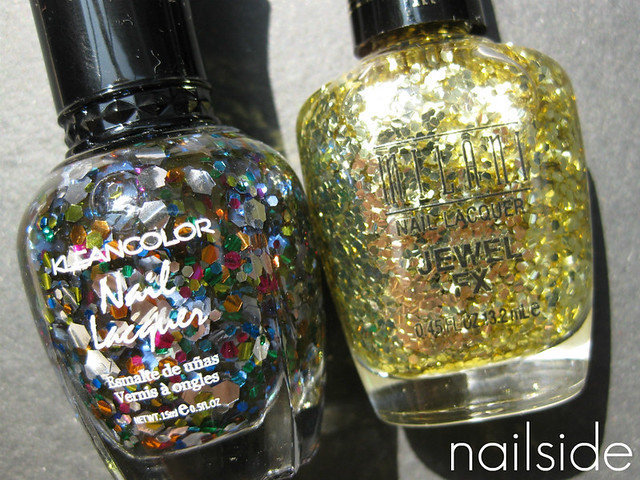
Hi guys, this post I have another Kleancolor layering experiment to share with you. The base color is Orly Sapphire Silk, a beautiful muted teal with a great application. On top I used Kleancolor's Afternoon Picnic, a clear polish filled with HUGE different colored and sized glitter. I'm talking about chunky glitter on steroids here! Just to make a comparison, I included a picture of Afternoon Picnic next to a Milani Jewel FX polish, which already has large glitters.
As I said, Afternoon Picnic is a blend of multiple colors and sizes glitter. Once you've finally been able to fish out some of them, it does look pretty. But man, I wish more of that amazing stuff would stick to the brush. I think I've had to apply three, incredible thick layers on each nail to reach the density as seen on the pictures. So it most definitely needs fast drying topcoat, otherwise it will take you about four ages to get your nails dry. So not the best application nor drying time... But would you look at the result?! It's so festive! And people will notice the glitters from a mile away.And last but not least, I also wanted to share the matt version of it with you :) Thanks for reading!

China Glaze First Mate + Kleancolor Party Fever
Hi everyone! Today I have a Kleancolor swatch to share with you. This glitter bomb is Party Fever, over one coat of China Glaze First Mate. Party fever consists of silver, aqua blue and purple hexagons, together with small red glitter in a clear base. It's the ideal chunky glitter topper, the glitters are dense enough to cover evenly in one coat, but not too dense so you can still see the base color underneath. And above that, the blend of colors and different sizes is very unique to me, you don't find a lot of glitters like these in the Netherlands! I really like it and it's also gorgeous with a layer of matt topcoat. Thanks for reading!


Orly Purple Pleather + Milani Jewel FX Silver

Hi guys, the other day I had a little party with some friends. I didn't have any time to do my nails that day, except shortly before the guests would arrive. I had about 30 minutes left, so I wanted something quick and fun that would scream "Partay!". And what better way to create a party on your nails than a sparkly layer of chunky glitter. The base color I picked was Orly Purple Pleather (which dries with a satin-matt finish) and on top of that I used one of my newest chunky glitter polishes, Milani Jewel FX Silver. The glitter was quite tricky to apply, some nails ended up with just one giant blob of glitter on only part of the nail, while the rest of the surface kept clear. But practice really makes perfect and I managed to spread the chunks evenly when I started on my second hand. The fast-drying topcoat that I usually reach for is Sally Hansen's Insta-Dri, but glitter this big needs more than that. So I pulled out the big gun: Seche Vite. One thick coat of it was enough to get my nails smooth and dry before my friends arrived. Mission succeeded!


China Glaze - First Mate + Gosh - Rainbow

Hello dear readers and new followers! Since I'm still enjoying my 4th of July mani from yesterday, I'll be showing you some older pictures today. Pictured is China Glaze's First Mate layered with the beautiful Gosh Rainbow. It was part of the prizes that I won with my flowered tips entry for the Get Inspired nail art contest, hosted by Sofie from Swaafie. Rainbow had been on my wishlist for a while, and though Gosh is sold here in the Netherlands, I'd never seen Rainbow anywhere. But then I saw it could be won in Sofie's nail art contest! So I entered and the rest is history... Enough talking, picture time! Gosh, I love flakies...


