Struck again


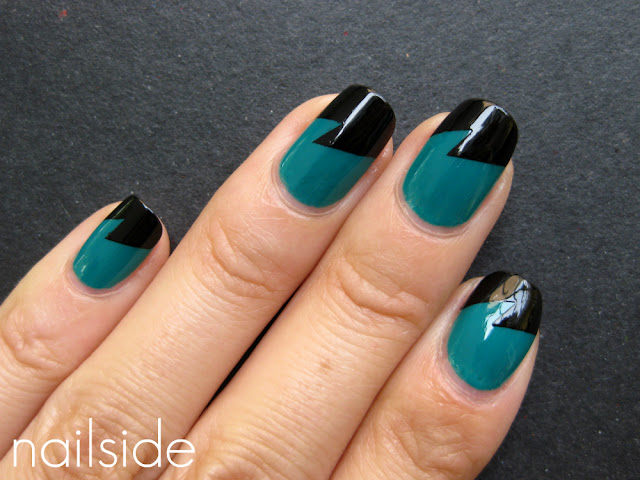
Hello guys! Since I'll be busy celebrating (mostly working, really) all day tomorrow during Queen's day, I'm posting this mani now :) It's another lightning bolt French. (Excuse me for the horribly corny names I come up with for my tape designs, but it's the best, non-confusing way to keep them apart.) The base color I used is Ms Jagger Green from Pieces, it's a really nice, bold teal creme, probably one of my favorite polishes. It applies very smoothly and covers in two coats, but the best thing is it doesn't stain! Which is quite rare for blue/green polishes. So no complaints at all. And the black is Color Club Where's The Soiree, if you've been reading my blog for longer you know it's one of my best buds!

I you like the lightning bolt design, just stay tuned because I've been preparing a tutorial for next week :) The design is very easy to do and great for tape-beginners. I've received some comments from readers that couldn't get my other tape designs done succesfully, so I hope this design will help those people to improve and get the hang of the taping technique. Goodnight!

Designs for Queen's day


Hi everybody, tomorrow it's Queen's day in the Netherlands. Queen's day is our national holiday when we celebrate the birthday of the Queen. This day is known for its free market, everybody is allowed to sell things on the streets, so it's a great day to (try to) get rid of your old crap and go treasure-hunting for someone else's :) Also people dress up in orange, as reference to the royal family (House of Orange-Nassau).

So for the big day I made some appropriate designs for my Dutch readers. On my pinky there's the plain Dutch flag, made with tape. Now some might say it's France's, but that just depends on what angle I'm holding my hands in :) Either way, making this pattern vertically is easier than horizontally, so that's what I did ;-) I started with the white and then placed a tape strip in the middle, after that I used a blue and red creme to complete the flag. As you can see I did the same on my middle- and ringfinger, but those are spiced up with gold accents: leopard print and a crown-shaped tip. The gold I used is 2030 from China Glaze. And people with less patients can do the fun layering-combo of an orange polish, layered with gold glitters. I used H&M Neon Orange and China Glaze Medaillon.
For a simple mani just pick one or two designs as accent nail. Or you go wild using all of them for a skittle mani. And if you're semi-lazy like me, you can go for taped flags on one hand and go full orange on the other.

I hope you like the ideas! I wish I could've posted these earlier but I just didn't have the time to. Anyway, enjoy tomorrow! And to the rest of the folks: I've got some nice layering combinations planned for the next couple of days! So see ya then! :)

Essie - Coat Azure


Hi lovey readers, today I have a beautiful color to show you: Essie Coat Azure from this year's spring collection. Coat Azure is a slightly muted - but still fresh - medium blue which makes me want to go to the beach, RIGHT NOW! It has this subtle but noticeable shimmer that turns this polish into something very special. I'm a huge creme- and blue-lover so I'm really happy to have this polish joining my collection. The formula was really good, I only needed two, thin coats for opacity and the drying time was pretty okay too, so I'm sold! What are your thoughts on this blue beauty?

Shim, shimmery, shim shimmery, shim shim sher-ee!

Lightning bolt French - mattified


Hi everyone! Yes, I mattified my mani, again! Haha. Don't you just love how a matte topcoat can completely change a look, only by changing the finish?! They're especially great for graphical patterns like this one, the matte finish reduces reflections so the pattern is more visible :) Have a great night!

Lightning bolt French


Hi lovely readers and new followers! Today I want to show you a new tape-desgin: the lightning bolt French! I came up with this idea to cover up tipwear of an old mani. Again, this design is very simple and easy to make, once you've gotten the hang of working with tape. I'd say it's as easy as the mummy pattern (which wasn't too bad, right?), only it takes less time! Because you need less tape strips. I'm pretty excited about this design, because it's graphical, edgy and easy to create, and I hope you are too :) If so, you can expect a tutorial on this design very soon...

I used Color Club Where's The Soiree? as my base color and the blue foil on top is from Hema, a Dutch department store.

Enjoy your day!

Strawberry Fields on steroids


Hey guys, this afternoon I showed you Color Club Raspberry Rush. Although I really loved it au naturel, I had to see what it would look like with China Glaze Medaillon on top. The result is fun, girly and glittery! Like Strawberry Fields on steroids :)

In direct sunlight

And once again I couldn't leave the matte topcoat... So I included a picture of it below. Goodnight!

Color Club - Raspberry Rush


Hi everyone! Today's post is about Color Club's Raspberry Rush, from this year's Wicked Sweet summer-collection, it's the only one from the collection I bought. Raspberry Rush is a scented, intense, blue-based pink neon. The pink is much more intense in real life, but my camera just wouldn't capture it, which is often the case with neons. As the name implies, Raspberry Rush is raspberry-scented, but I'm not sure if you'd recognize it if you didn't know the name. All I know is it smells sweet! Even after a layer of topcoat. The scent is pleasantly intense if you smell your nails from up close, but not noticeable from further away, which is a good thing since the smell of scented products can be disturbing sometimes.

A few cons: Raspberry Rush is pretty sheer and the drying time a bit longer then I'd like it to be. Although there's still VNL after three coats of polish, I can live with that because it's just very subtle and the formula is great. So despite its downsides, Raspberry Rush is still a winner in my opinion, because of the beautiful color and the nice formula. Did you buy anything from the Wicked Sweet collection?

Mint mummy


Hello guys, happy Easter! Last post I showed you a gorgeous muted green, #82 from Hema. The formula was quite disappointing but the pretty color makes up for that. Though the color isn't a true mint, 'mint' formed such a nice alliteration with 'mummy' :) And the color matches very nicely with Catrice's I Sea You!, so I used that on top of it, using the mummy tape pattern. These pictures were taken a little while ago, but since they're so appropriate for Easter, I waited till today to show you guys. So for today an Easter mummy, in soft, dusty green. Hope you like it!

Hema - #82


Hello everyone! This might be more interesting for Dutch and Belgian readers, since this is a swatch of a polish from a Dutch department store, Hema. In the old days Hema only had 'regular', conservative polishes - which were usually cremes in pink or red, nowadays however it's really catching up polish-wise, launching new, modern collections regularly. But because the polishes still don't have actual names, I can only refer to this lovely color as #82. I wanted to love this polish so much, but it's just not a win. #82 is a bit streaky and creates bald spots after the first coat. Three coats were needed to make everything opaque and even, which sometimes didn't even want to happen, I had to do 2 nails over! Despite its cons, I'd probably still want to wear it frequently, because the color is just really pretty! It's more than 'another mint green' since it's not actually mint, but a muted, pastel green. And me like muted colors! Price: €2.50 for 11ml.

Pink and black mummy


Hello everyone! I'm still hooked on the mummy, so for today I have a bold pink and black one to share with you. The pink is OPI Don't Know... Beets Me! Unfortunately it was a bit disappointing, I applied three coats and in some light there's still VNL, the formula is pretty okay though, as is the drying time. I used Color Club's Where's The Soiree? on top and boy, I love this black so much! The formula is perfect and it covers with just one thin coat, so very nice for tape manis! Thanks for stopping by :)

A galaxy far, far away

'Click me, I'm huge!'

Hi everybody! Last post I had some layering fun with OPI Russian Navy as base color. After layering it with Ulterior Motive and Last Friday Night, I ended up with this beautiful blend of different colored shimmer and glitter that looked like a galaxy filled with stars. I've always been fascinated by astronomy, ever since I was little, especially stars look so wonderful, beyond gorgeous. Anyway, I was very curious to see what the mani would look like with a layer of matte topcoat and this is it. You can't get closer to the real deal than this!


Close-up!


In the shade

OPI Russian Navy + two layering experiments

Hey guys! Yesterday I received my Ebay order of some polishes, including OPI Russian Navy. I'd seen many swatches of it on blogs and absolutely fell in love with the pink/red shimmer in it, which makes Russian Navy not just any navy. In the bottle it appears more like a blue-toned purple, but on the nail you can really see the true navy color. And the formula was good and it applied well. The thing with many OPI polishes is that the polish looks extremely sheer after the first coat, but somehow the second coat usually manages to make everything opaque, the same goes for Russian Navy.

OPI - Russian Navy

Of course I had to play with the rest of my haul too, my order also included Color Club's Ulterior Motive, which was very sheer on its own (3 to 4 coats for opacity) but wow, it's so pretty layered over darker colors! In the case of Russian Navy, it gives it a purple glow and enhances that beautiful pink/red shimmer I was talking about earlier. Ulterior Motive also has a gorgeous shimmer with pink and blue, but it's a lot more out there than the one in Russian Navy.

Russian Navy layered with Ulterior Motive

Just when I thought it couldn't get any better, Last Friday Night was leering at me from my desk. So one coat of Last Friday Night went on top of Russian Navy + Ulterior Motive, aaand more awesomeness was born... Can't you just look at it forever?! Thanks for reading again :)

Russian Navy + Ulterior Motive + Last Friday Night = huge amount of awesomeness

I ♥ geometry


Hey guys! Today I want to show you a new tape mani, in classic black and white. For the pattern I had to cut many tape strips, which wasn't the hard part, but removing all those things! And because I needed so much time to remove each strip one at a time, the black polish had already dried which made my lines less crisp. So I had to touch up a few lines afterwards. As the title of this post says: I love geometry! Geomatric patterns work so well on nails and often are even visible from a distance. The black and white I used are my favorites: Color Club Where's The Soiree? and Essence Stamp Me! White. Both are very opaque and fast-drying. Finally I used a coat of Seche Vite on top. And that's how this was done, see ya! :)

Mani with rivets


Hi everyone! For this post I have a mani with rivets. The idea for this design actually came from my dad and I thought it sounded interesting as a design. As you can see the pattern is very stylized. I like that it looks a bit mechanic though I don't think the pattern really looks like rivets, maybe more like a domino game, haha. I used Color Club Where's The Soiree? as base color, the version I have dries with a satin finish, but I kind of like that. And I used China Glaze Millenium for the rivet-pattern, which is made with a brush and dotting tool from Born Pretty.

So what are your thoughts on this look and would you wear it? Good night :)

Blue mummy


Hello dear readers and new followers! Just a quick post for today. You might recognize this mani from my mummy mani tutorial. I used OPI Suzi Says Feng Shui as base color and the metallic blue on top is China Glaze Adore. On its own, Adore can leave brush strokes at times, but it's great for tape manis and opaque in a single coat. Yay for one-coaters! :) So if you like this tape mani and want to create it yourself, just check out the tutorial here, if you haven't seen it yet.

Talk to you later :)

Vampy French


Hi everybody, how's the weekend? The mani you're looking at is my vampy French, which I made quite a while ago, I don't know why I didn't post it before, for some reason I was waiting for the right time. Anyhow, this design was inspired by the brogue's wingtip. My first attempt to create it pretty much failed, the black tips were freehanded and therefore a bit wobbly and uneven. So for the second attempt, which is the one on the pics, I used tape. Oh, precious tape, I couldn't live without it! Haha. I started with a red creme base (the discontinued Catrice from the Mickey mani), then I cut heartshapes out of tape to place on top and finally I finished it with a black creme for the tips.

What's funny is that when you focus on the red parts, you'll see sweet hearts, but when you look the black tips you'll notice the fierce batman-ish shape. So this mani could've been named 'The batman French', but 'vampy' just sounded... uhm... vampier! Thank you for stopping by :)

Just like a circus


Hi dear readers! For this post I made another tape mani, surprise! However I keep experimenting in the hope of discovering new designs :)

This tape pattern is made with wide triangles, using five or six a nail, all pointing to the center. This creates something that looks a bit like a circus tent ceiling. I like this look for it's simplicity and graphical element, so pretty sure I'll do this design regularly in the future. And when I do, I'll just call it circus, for the sake of convenience :)

The colors I used weren't exactly planned, I happened to be wearing Strawberry Fields when I came up with this idea and thought 2030 would fit perfect with its gold shimmer, but I think it turned out quite cute!

What are your thoughts? And have an awesome day!

Checkers with Untamed Luxery


Hey everyone! The other day I was wearing oh-so-pretty Untamed Luxery. Though it still looked perfect, my fingers were already itching to change my mani the next day, (what can I say, I'm an NP-addict...), but not before I'd played with it. So I made an Erika inspired checkered mani, which I haven't done a long time, using China Glaze Millenium. And I must say I like the combo :) My boyfriend, however, keeps saying this look is way too Middle Ages, that the checkers make it look like a knight's shield... Thanks, dude! Oh, what does he know about nailpolish?! But man, Middle Ages would be SO jealous of my glittery shields! Mwuahaha...

Tutorial: Mummy tape mani


Hi everyone, my second tutorial! This time it's another simple, easy-to-achieve look: the mummy pattern. The mummy tape pattern is basically consists of placing tape strips of any size underneath each other, preferably a bit diagonally. This creates a funky design which looks a lot like wrapped ribbons, hence 'mummy'. Continue reading »

Crackled Barry


Hey guys! So this is another upgrade I did from my last mani ('The couple'), talk about recycling! Lol. I loved the combination of the pink and blue, both very bright and bold, so I thought it would look great under a black crackle polish (Barry M Nail Effects). But the result is... meh... Somehow, the crackle made the whole very flat, less vibrant. I liked it better without. What do you guys think?

The couple


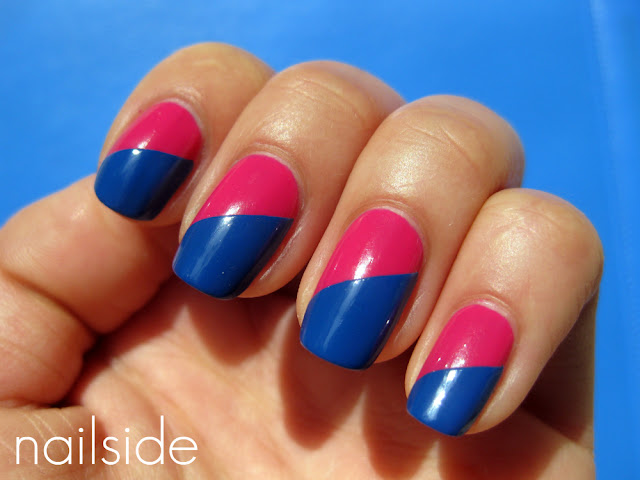
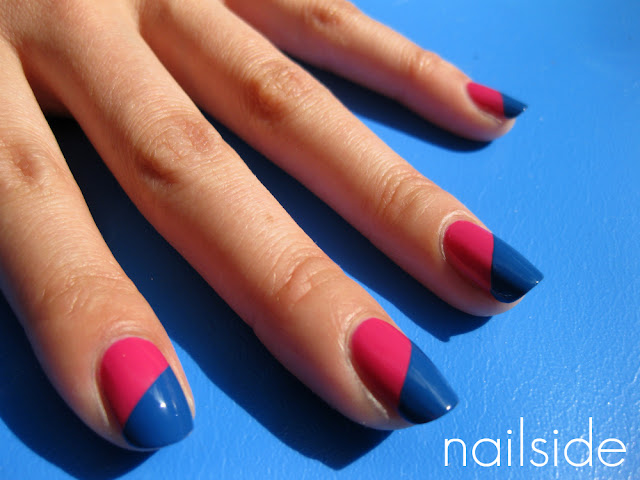
Hello dear readers, for this look I upgraded yesterday's mani, which was Barry M Shocking Pink. It's amazing how little effort it takes to completely change the look with just a piece of tape. Shocking Pink on it's own was girly fierce and summery, but with Cobalt Blue added to one half of the nail, the whole becomes sporty and kind of '80s. Oh, the '80s style on the nail, don't you just love that? I'm sure I'll do an entirely  '80s-themed post with several looks in the near future, can't wait!

Have an amazing day!

The beautiful couple:
Barry M - Shocking Pink & Cobalt Blue

Barry M - Shocking Pink


Hey guys! The polish I'm wearing today is Barry M Shocking Pink, a beautiful, bright Barbie-pink creme. So girly but fierce at the same time. I absolutely love Barry M creme polishes, the formula is great, they're easy to work with and only need two coats for opacity. On the picture there's still some VNL, but it's barely noticeable in real life. Pink! I love it... Have a great day!

Neon plaid


Hello readers! Do you remember the neon crackle mani? Well, when I was working on that mani, I discovered you could do pretty cool stuff with layering neons. Because of their sheerness new colors will appear when they're overlapping. So I was very eager to try out this plaid pattern with the four Color Club neons I own, which are Almost Famous, Warhol, Chelsea Girl and Age Of Aquarius.

I started out with two coats of Essence Stamp Me! White. Then I created two vertical stripes on each nail, using two of my four neons and tape for straight lines, after those had dried, I did the same thing horziontally with the colors that were left. And that's how plaid is made! Lol. Thanks for reading, gals! :)


Close-up!

Trust In Fasion with Untamed Luxery


Hey everyone! Today I'm wearing one coat of Color Club's Untamed Luxery on top of two coats Essence Trust In Fashion. I'm a huge lover of teal and glitter, so you can imagine how I feel about this combo... I must've had Untamed Luxery in my (online) shopping cart about three times before I finally decided to buy it, why?! It's so pretty! So I'll just stop babbling and let the pictures do the rest. See ya :)

Color Club - Untamed Luxery
'Don't you just LOVE me?!'